Showing posts with label izink. Show all posts

Monday, October 20, 2014

Clearsnap and Stencil Girl Blog Hop- Hand Dyed Fabric Pillow


I am on a quilting kick right now and although I am primarily a paper craft designer- I am always looking for ways to combine materials and techniques. Today I am playing with these two cool 9x12inch over sized stencils from StencilGirl:

Bubbles
Marrakesh Mix
I thought they would make a very cool hand dyed fabric. But since I am experimenting, I decided to start small and do a patchwork pillow- incorporating my hand dyed fabric into it. I used a resist technique and Izink Pigment, but you can also use any Clearsnap Pigment ink refill, or you can directly ink on the fabric with Colorbox Crafters Ink. Here is how I do the technique:
{first, you will want to spray the BACK of your stencil with repositionable fabric adhesive. Did you know there is a front and back to stencils? Just look closely on one of the corners you will see a manufacturers mark of some sort, thats the top!}

{lay your Stencil on top of a piece of muslin that is cut slightly larger than the stencil. Take some white acrylic paint and brush over the stencil. The white will act as the resist when we dye the fabric}


{I set up my dyes by dropping 3-4 drops into some small plastic containers. I use my melamine cutting board as a work surface, but a cookie sheet would work too}

{get the fabric immersed, and then lay out on the work surface}

{Now the dip in the dye is just to get the fabric wet and to allow the color to bleed. Now take the Izink dropper and drag over the fabric like show}

{now twist it to get the dye all soaked in (i know I should have done the demo with the blue-looks like a bloody mess!}

{Roll Fabric back out, and dab off excess ink from the stencil resist portion}

{Repeat with your other color. Hang out to dry making sure the drip area is over grass or dirt. When dry, press with a steam iron}
Sorry I didn't get more pics- but I go zoo into making this little pillow! Basically I cut the hand dyed fabric into 3- 2.5x9 inch strips, then used some of my on hand scraps for the rest.

{if you want to make your own I followed this free tutorial from DREAM PATCH HERE


{I quilted with a contrasting red to get my dyes fabric to stand out even more}


For the back I used and inexpensive screened cotton fabric- it mimic the resist technique on front

{Its just a little pillowcase pocket opening on the back for each cleaning}

Puffy Loves his new pillow, and I love it for sitting my laptop on when it gets to hot o my lap!

SUPPLIES:
white acrylic paint
Muslin
Foam Brush
Extra fabric and Batting
Pre made pillow form


Sunday, November 3, 2013

Handmade Holidays Blog Hop- Toilet Paper Roll Gift Card Holders


Hi everyone welcome to the hop! I wanted to make a project that was super compatible with using all of the great companies featured today on the hop- so although I didn't use everyone of them- I am adding in some ideas and options that you can use all of your stash for! Let's start by saving all of the toilet paper and paper towel holders. So many cool crafts to make with them! I manage a grocery store in real life-so I am not a holiday shopper-it's gift cards for all. However I do like to give those cards in a unique and fun gift card holder-handmade with love!

{Can you believe these are toilet paper rolls! I left mine au naturale before I sprayed them with new iZink Pigments. These are imported all the way from France and are being distributed by Clearsnap. You can use any of your sprays including- Stephanie Barnard, and Colorbox Spritzers}

{a single roll will make one holder, a paper towel holder will make 3- just eyeball cutting it into thirds. Flatten and press down with a bone folder- you can seal bottom edge with any glue or adhesive or use a stapler. If you want more true colors and a less rustic look-paint your rolls with a white acrylic base before you spray.}

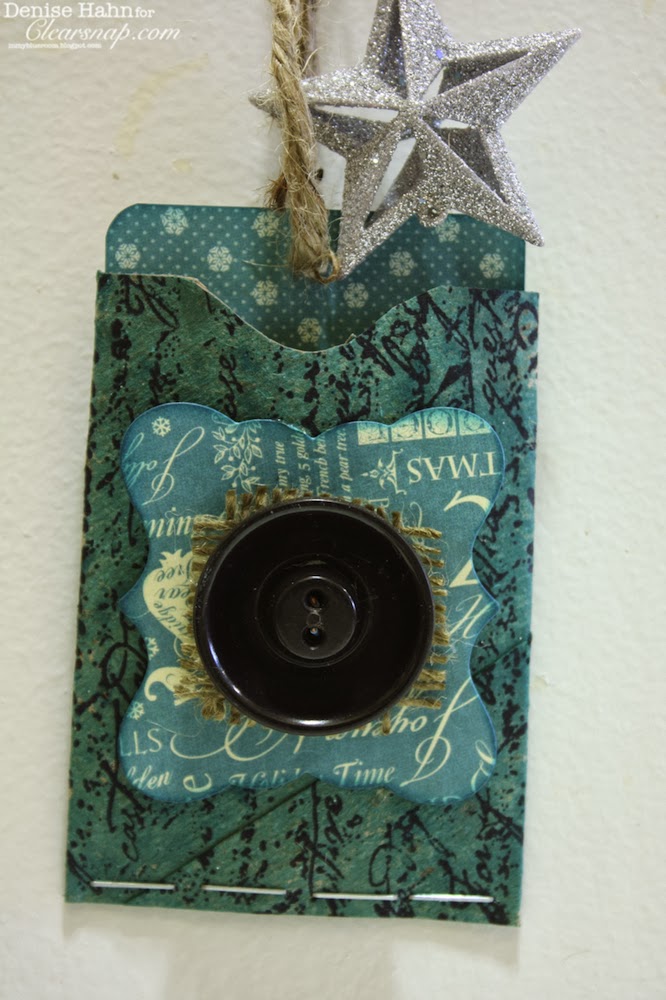
{For this one i used iZink Tomato. Just drop a few drops with a little water in a spray bottle and spray away. I then used Colorbox Pigment Ink in gold and My First Colorbox Stamps "Snow Day". Use your favorite Sizzix die cut- the Framelits will work awesome. I edged my Graphic 45 die cut shape with Donna Salazar Mix'd Media Inx in Schoolhouse. I layer on a small piece of burlap to echo that natural look then added a vintage button all with hot glue}

{this one is iZink in Opaline-then stamped with the My First Colorbox stamp- I used a stapler to seal up the bottom of this one}

{This one is iZink inTurquoise then stamped with black pigment ink using my Clearsnap Rollagraph "Word Words"}

{this one is iZink in Silver and I used Donna Salazar Mixed Media Inx in Schoolhouse with a Colorbox Art Dauber to make the dots-love these!}

{To finish them all off I used the leftovers from the die cut- cut them 2.5 inches wide and about 4 inches long-inked them in coordinating colors using Colorbox Queties. I used some plain jute twine for the tie}

{I used Graphic 45's 6x6 12 Days of Christmas paper pad. The backs are all solid to make sure you have room to write on your gift card. To attach your gift card just use your tape runner or a glue dot!}


{These little carriers can be hung from a tree too! Hope you have a great handmade holiday!}
4 More blogs to go- you can do it!!!!
Sizzix – Eileen Hull Designs http://eileenhull.blogspot.com/
Nathalie Kalbach www.nathaliesstudio.com
Tanner Bell   http://www.craftteen.com
Jennifer Priest http://hydrangeahippo.com
Vicki O'Dell http://vickiodell.com/
Denise Hahn http://inmyblueroom.blogspot.com/ <----------you are="" here="" span="">
Courtney Chambers http://www.alittlecraftinyourday.com <------go courtney="" here="" next="" span="" visit="">


{\rtf1\ansi\ansicpg1252 {\fonttbl\f0\fmodern\fcharset0 Courier;} {\colortbl;\red255\green255\blue255;\red0\green0\blue0;\red254\green254\blue254;} \deftab720 \pard\pardeftab720\sl360\partightenfactor0 \f0\fs24 \cf2 \cb3 \expnd0\expndtw0\kerning0 \outl0\strokewidth0 \strokec2 a Rafflecopter giveaway\ }