Tuesday, January 22, 2013

Graphic PDF and iBook Tutorial Available here!

As featured on Graphic 45 blog. This tutorial is available in both PDF and iBook format for those of you with iPads. This is an intermediate to advanced project and is filled with fun techniques. You will hand make those candy pieces, heat distress ribbon, sculpt with foam core and decoupage with masking tape! This tutorial is 68 pages long and is filled with BIG pictures and step by step instructions. It also includes a printable template and a supply list. You can make a Nutcracker one like mine, or pick your own theme and papers. Once you get the technique down, you can make almost any kind of paper crown! $10
                                                         
YOUR TUTORIAL WILL BE EMAILED TO YOUR PAYPAL EMAIL ADDRESS WITHIN 24 HOURS OF PAYMENT (USUALLY SOONER!) PLEASE MAKE SURE YOU CHECK YOUR PAYPAL ADDY!


Friday, January 11, 2013

CHA Winter 2013 Day One

This is the first year I have attended CHA as a Member. When I stepped up to the membership desk and the representative was asking for my "documents" proving I was worthy...I realized for the first time, I really am a Professional in the Crafting industry! So Day one of CHA the showroom isn't open. So all of you who have been asking for pics...there aren't any. There are only classes, workshops, and seminars. Because I joined so late a lot of the classes were full, but I didn't mind at all. Of all the things I did, my favorite was a panel discussion from the Designer Board of CHA. The panelists were great and gave great networking advice. I also watched seminars on  making videos, and also social networking. There is SO much I did not realize about social networking...I think with very little effort and just doing the right things I can really improve in this area. After I did my first few seminars, I went down onto the floor. Luckily I could get in because as a member of the Graphic 45 Design Team- I am double badged as an exhibitor and as a designer, it kind of doubles my access to things. I went to the G45 booth which has a great spot right at the entrance and dropped my design team projects off. It was so nice to meet Aimee, Diane and Joanna. Both Aimee and Diane took the time to actually look at my projects even though they were super busy getting the booth ready. It's always nice to hear the praises of the company owner! I then snuck over the the Clearsnap booth and dang, that girl April was already set up and gone! Luckily I got to meet her at the designer preview, where some of the manufacturers preview their new items just to us Designers. I got some free products too....some Faber Castel Gelatos, some Beacon adhesives. And then got to make a little ring with some cool epoxy clay...I am in love with this CLAY! I gave my card to the owner and he is going to send me some samples...this stuff is way fun and sets up super quick so I can use it in classes..hint hint! Tomorrow the floor opens, I did get to peek a little at some of the booths, but there was so much garbage and packing materials it was pointless...I have not planned any seminars tomorrow I plan on just hanging out at G45 and walking the floor..... So TOMORROW I promise lots of pics!

Friday, January 4, 2013

Off to the Windy City!


Sometimes those unexpected plans are the funnest. Hey you want to go to Chicago for the weekend? um....sure! My friend Sandra got a new job which requires her to train in Chicago for two weeks, so I am going to keep her company over the weekend. It didn't hurt that she forked over her airmiles and is paying for the room! She has been before and has aways told me how much I would LOVE Chicago, so here I go- leaving today at 1225p from LAX and coming home Sunday night. Lets see the plan is; ice skating millenium park, The Throne rooms at the Museums of art, Sears tower-or whatever its called now, dinner at a Steakhouse, Chicago pizza (with no sauce for me!), maybe a show at SecondCity, and drinks at a piano bar..with a view....can we cram all that into a weekend? Of course- Sandra and I are well traveled together so we will figure it out! I plan on really just relaxing, laughing, putting all work worries away. When I return I have jury duty- I am one of those FREAKS that LOVES jury duty- and as a bonus I got called the the Compton courthouse- so my chances are good at getting on  a case. THEN right into CHA....I am so excited to be going to represent Graphic 45 and Clearsnap. I hope to do a little networking too, to try to find my dream job....but yeah keep dreamin!

Friday, December 28, 2012

Time to start scrappin!

Now that Christmas is over, it's time to start working on those layouts! Visit the Clearsnap blog today and check out my Shop till ya drop layout. I used some of my favorite papers from October Afternoon and of course lots of Clearsnap goodies.

Friday, December 21, 2012

Vintage Christmas Gift Bag Tutorial Featuring Graphic 45 and Scrapbook Adhesives by 3L

Okay, so it has come this, Gift Card mode! When did it happen that we stopped buying gifts and just went straight for the gift card section?  I guess since the invention of Gift Cards! Don't get me wrong, I love a good gift card myself, but in a way, they can seem a bit impersonal right? Well no longer, I have a great way to add that special touch to any gift card: Put it in an amazing handmade gift bag! It's the gift that says: I love you so much I went to the trouble to HAND MAKE this gift bag just for you! Now here's your Starbucks gift card... enjoy!
Start by finding a sturdy box about the size you want to make your bag-to be able to use on 12x12 sheet of scrapbook paper make sure the entire diameter is no more than 11 inches around. Measure its length (my box 5 inches tall) , then measure its depth (my box 1.75 inches wide) and then add the length and depth+ = 6.75 inches by 12 inches will be what I cut.

Line your box up in the middle and "dummy" fold one of the sides up. Dummy folding is to just fold up against the edge lightly so you can see where to fold, but without making a hard crease

Dummy fold each crease you need one by one, and then make the hard crease with a bone folder-making sure your paper is even- after you do all four creases take your Scrapbook Adhesives Crafty Power Tape to glue down the seam-keep the box INSIDE!

Then fold down like a present- your paper will line up perfectly and you will have the 1.75 inch to fold over- again use Scrapbook Adhesives Crafty Power Tape- This stuff has an amazingly strong hold which you will need

Next I took my Imaginarium Designs Chipboard Frame and inked it with Clearsnap Cats Eye in Gold-set aside to dry

Cut out a piece of Graphic 45 Christmas Emporium Paper, and highlight with some glitter. I used Clearsnap glitter and a Martha Stewart Fine Tip Glue pen.

And now for my little trick! This chipboard frame is very delicate, and I used Scrapbook Adhesives tiniest 3D foam dots, but they still showed ever so slightly! So I went ahead and put them on.....

Then I flipped it over, hit it with some gold glitter, and pressed the glitter onto the showing part of the foam square with a brush and voila, they disappeared with a sparkle! 

I then attached my cardstock piece to the frame, then added another layer of foam dots


To embellish, I added a sticker from Jolees French General Labels, some upholstery trim to the top (with hot glue) and then some Petaloo Flowers

Now, take the box out! You leave it in so you have a nice support to embellish your box with

Pinch in the tops, to give it that "Ima gift bag" look

Hot glue on some Handles. Wire ribbon works best.

Now make some custom filler. Roll up some vintage paper the long way

and with your scissor trim off approximately .25 in slices. But mix it up-it looks cooler (I mean more handmade) if they aren't all uniform

Loosely fluff up the cut pieces and then hit with some Ginger Ale Smooch Spritz to give it a little shine

Then scrunch it up in a tiny ball, then fluff and repeat. Use to fill your gift bag.
{Oh yeah add a little gift tag while your at it! G45 gives you a bunch to choose from}


{can you even tell the 3D squares are showing through??}

{here is another variation. I added another 1.75 inches then just trimmed top with pinking shears, punched to holes and added trim and a tag}

{and anther variation, I added 2 inches and then trimmed with a Fiskars border punch. Then made my holes on the sides, ran wired ribbon and knotted. Then curled the ribbon off to the sides.}
If you didn't come here from the G45 blog head on over for more pics:


Monday, December 17, 2012

Metalsmith 101 Trials and Tribulations

So a lot of you may not know but I had finally registered for Metalsmithing at Long Beach City College.  I felt that as someone who likes to teach classes it is so important to constantly be opening myself up to new techniques to make sure I am giving my very best when I hold a class or workshop. First and foremost what I did not realize was I was taking a 4 unit class. I don't know why I thought I could just go to class 2 times a week and finish everything I needed to. My heart sunk when the instructor Kristin Beeler told me we had to commit to 56 hours of lab time? 56 HOURS??? She apparently did not know my reputation as a "speed crafter" able to finish complex projects in a fraction of the time required! Apparently I was unaware at the level of work that goes into a jewelry piece that is entirely handcrafted. No running downtown and buying a bunch of components and whipping something out in an hour. The first project took 6 weeks. 
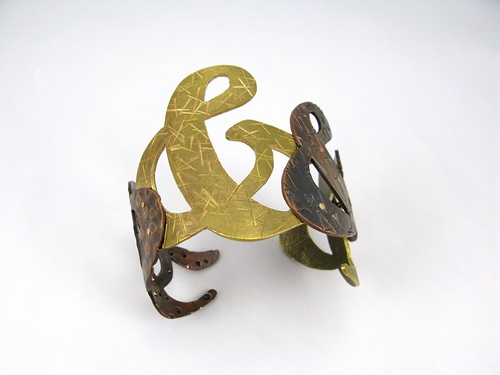
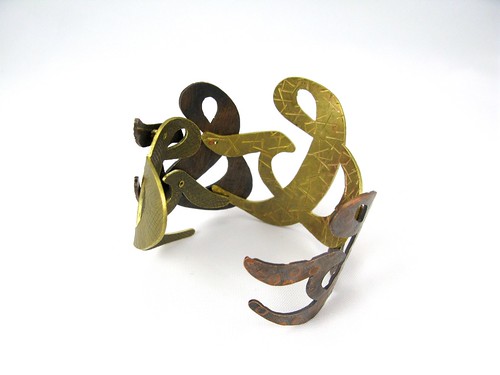
It was a bracelet composed of 4 individual silhouettes that were cold connected with rivets. I chose an ampersand for my silhouette. I love the way it came out and lucky for me got an A.
denise
denise
Our next project was a tiny Brass Box. Holy Shit! This thing required some serious accuracy and precision. I suck at accuracy and precision. I had no idea how this flat piece of brass was going to get made into a tiny round box that makes as "pop" sound when you open it...if you do it right. 


Here is my box, you may recognize the Prima rose icon.  This project we soldered. Not stained glass soldering which is what many of us in the craft world make (and LOVE by the way!). This was actually constructing an object using solder and a torch. Taking a strip of metal, shearing it off, bending it into an oval, matching up the ends, so you can see NO light, then putting tiny tiny tiny bits of solder and tons tons tons of flux on it and then torching the hell out of it. Then, you beat it into a round shape-file it, and sand it one million times. REPEAT! I agonized over every imperfection I found...but it paid off:

{she was being kind! I did meet all of the requirement though...}

Now onto the project final. The final was like not knowing how to swim and being pushed into the deep end. Well not exactly, Kristin did a great job of teaching all of the techniques to us. But then we had to make a ring- a ring we designed, with no step by step instructions. Just using what she taught us. We also had to write up a recipe-or instructions on how we were going to accomplish this- WITH a timeline/calendar. Has she lost it?? We are not prepared for this...or are we?
I wish I had pictures of some of the other students work. Most of the final projects were amazing, I think some of the others could have been if given more time. Here was my final ring. I tiny version of one of my favorite things to make, a birdcage. I have hand-wired many of these in full size before, but this one would try my patients!

She is made of mostly copper with some nickel. 

Inside is a tiny bit of printed out vintage newspaper. It was Kristin's idea and I hate her for it because it was brilliant...I should have came up with it....I needed to break up the darkness in the bottom of the cage and give some contrast to the wire cage- this worked beautifully

I used a rubber stamp and some permanent ink to make the pattern then etched it with etching solution

The tiny swing was only if I had time. I did have time and made it out of copper wire. It just blended in with the wires so Kristin suggested I make it from sterling silver...I had none so I used nickel. It stood out much better, but sterling would have probably done better. Dame she is GOOD!

Here is the side. The holes are not only for venting during the soldering stage but also decorative. However- I got the top hole filled with solder. I was too lazy to fix it...so I tried to say it was intentional- it didn't look bad at all! However she was not about to let me get away with it- it says clearing in the requirements for the piece- NO decorative solder! LOL, I guess I am not the only student to try to get away with that as a design choice.

I DID want it to say FLY. But see you have to do this thing they call file and sand...and basically I filed away the L. There was no way of fixing it. She told me if I tried to re-punch it, it would be ruined. I defied her and tried anyway, and guess what she was right! It did not work. So I left it.

from the top

hard to believe it looked like this at one point.
So metalsmithing. I learned a TON. Not just about design and construction, but how Kristin taught. I really like her style of lecturing and demonstrating then letting us work on our own. I feel like I learned the "right" way to do things. Have I caught the metalsmithing bug? Maybe just a little! I feel like it opened up a whole new world of how to construct things. I also realize I need a very specific type of studio to do this work in. I just cant accommodate that right now, but maybe in the future. I have so many ideas of how I want to integrate some of what I learned into new projects and workshops. I really want to take another class from Kristin, specifically her production class. But it will have to wait. This class totally overwhelmed me with the time commitment. Working full time, designing for two manufacturers, skating roller derby,  and even taking a break for the Winter Wonderland weekend of fun, totally stressed me out!  And during the few final weeks of class my mother got severely ill and that just took immediate priority! But somehow I squeezed it all in...am I ready for round 2? Yes, but with a break! Now I know what to expect and will clear my calendar!