Monday, January 30, 2012

The Art of Craft at French General

{Pam Garrison's fun embroidery, would love to get to this level!}

French General, is a wonderful little shop tucked away by a freeway underpass in Los Angeles near the Silverlake district, it small only in size. Owner Kaari Meng has it filled to the brim with her fabrics that she designs for Moda. Along with that are tons of vintage beads, millinery, vintage paper, ephemera, and the list goes on. This is the second year that Kaari has hosted the Art of Craft weekend at French General, and it just so happens that they always fall near my Moms birthday. Now attending has become a tradition and as long as Kaari hosts them, we will be there for Moms birthday. I chose the Sailors Valentine class with Charlotte Lyons and Pam Garriosn. I like to do things a little outside of the box and I am NOT a embroiderer although I do enjoy sewing. We started off with a little instruction and then were cut loose to hit the "share" table. A table filled with goodies that we could use for our projects. After the initial throngs cleared away, I went over and chose some stuff for my heart. I did bring some of my own vintage fun though. I bought this baggie full of vintage fabric covered buttons and have been looking for someplace to use them. As usual I was speed crafting, I just have this thing that I must finish the project, because I find it hard to get motivated to finish them when I get home! Mom, didn't get as much done, but I know that when she gets home she will be "playing" with it and putting her own spin and little touches on it. Here are some pics from the class. Can't wait until next years classes!
{okay this was so wierd, the open seat had a book on it that said "Hahn", then when i looked up higher were the words "DE VENISE" which is reallly close to my name!}
{hey, who made this mess??????}

{Me and my Mom}


{the share table..oh la la!}

{My little heart and vintage buttons}

{Moms work in progress}

{my girl Terry, we were at different tables, but I see her ALLL the time!}
-Follow Kaaris blog and the French General website for info on upcoming events.
Saturday, January 28, 2012

Valentine Crafting

I think Valentines Day is second only to Halloween for me when it comes to crafty inspiration. Pinks, creams, whites and reds! I just love the colors that Valentines Day brings. Here are a few of my creations. I made them at our girls crafty Sunday. The last Sunday of the month each of us hosts craft day at our homes. This last Sunday was at Holly Stinnetts lovely home in Los Angeles.  I dont really have any pics of the day though....why you ask? For some reason when I bring my camera I feel sort of like a reporter for my blog instead of a guest just enjoying the company. Does that make sense?

{this first little banner is easy and fun to make}
 Cut out some .25 inch foam board into pennant shape
apply modge podge with a foam brush
lay tissue paper on top and gently tap down
set aside to try
Cut smaller pennants out of vintage book paper
ink the edges
After your pennants dry distress the edges with ink
stick on vintage book paper
Punch holes in upper corners
attach letters
string seam binding through, making sure long enough to hang

{now where to hang it?----too busy here}

{too up high here}

{ahhh just right! The door to my craft room}

{here is another cute one I made from Vintage valentines Holly provided for us}

{so cute, a little doggie banner}
This one is super easy to make
Cut out 5 like sized hearts from decorative paper
cut out card stock in a rectangle, big enough to show from behind your image, yet small enough not to cover too much of the heart base
Ink edges of everything
find some cute vintage valentine images using google image search- print and cut out
assemble using foam board pieces or pop dots
add a little glittery flower embellishment between the valentine and cardstock.
Punch holes and string with ribbon or seam binding

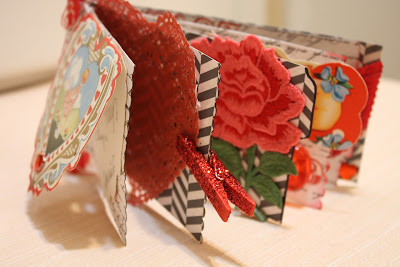
And then this cute little book I made with goodies that all the girls brought! Of course we all bring extra little goodies to share with each other. After I finished my banners I decided to make a little scrapbook to put all of the goodies in. 

{I hade everyone sign my valentine!}

{inside here are some of the goodies!}

{Holly gave us these cute little red and white straws, I just had to incorporate them!- I used a binding technique I learned in the book. ReBound.


{as always it was a fun day topped off with tasty birthday cake for Holly and Erin. I feel so fortunate to have all of these girls in my life!}
-Denise

Thursday, January 26, 2012

Featured on Crescendoh

This week I have the honor of being featured on Jenny Doh's amazing blog here:
http://blog.crescendoh.com/art_saves/2012/01/balancing-boxes-by-denise-hahn.html

I thank Jenny for all she does for artists and this wonderful community we are all a part of-
Denise

Saturday, January 14, 2012

Jewelry Kits on Sale!

I have a few of my jewelry kits available and have reduce the price to clear some space for more! My goal this year will be to offer a kit or class each month. So look out for my next kit in March.This kit comes totally complete, everything you need to make it is inside....beads, headpins, clasps etc. And the best thing, is that it is TWO pieces in one. Wear it as a charm bracelet or attach the extension and wear it as a necklace. Fun and easy to make, you just need to know how to wire wrap. There is even room to add some of your own jewels if you really want to bling it out! Here are some samples and they are only $17 each! 
PInk Convertible  click to acces the listing!

Teal Convertible  click to access the listing!


Friday, January 6, 2012

Quick and Easy Bracelets!

In my haste at the local jewelry supply I grabbed some wire. When I went home to start using it I was so irritated. This wire would just not bend! When I clamped down on it to force it, it finally did, but I was never able to get it just straight! What kind of piece of crap wire is this??? I picked up the package and realized it was some funky "magic" wire. Well the magic wasn't working on me! I tossed it aside and moved on. As I was doing my lengthy craft room cleaning I ran across that demonic wire and figured, maybe I can do something with it...... how do you keep the beads on? On the package it had some little round balls that required special "magic" glue. I'm thinking- forget it!!!! That is until I was at Athena jewelry downtown. That's where I pick up my bulk supplies. I asked the employee where I could find those little balls and glue for that weird magic wire stuff. She replied, oh you dont need that, just take your round nose and loop it off. You can even add a little charm on the end. She then showed me this elaborate bracelet made of turquoise beads. It was impressive. Thanks I said, and dropped off the obligatory 100 bucks. When I got home I whipped these up with just left overs....I have to say I'm likin' the magic wire! Quick, easy, cute and a great way to mush together all those little leftover beads and buttons..... try some for yourself!
{Okay already, I love skulls! Especially juxtaposed with these lovely vintage creams and whites.}


{I used little tiny beads in between the buttons to make them spaced properly-see the drop pearl on the left and the glass flower button on the right}

{I loved how the buttons worked, just need to figure out how to use the ones without the back stem}

{I even sqeezed a few charms in there, like this little bike!}

{here is the second and more straight forward one, using a mix of grey pearls and smoky crystals}

{Just used a vintage focal button in the middle}
-These were just too much fun! You must try the magic wire you can find it at Michaels!!!
-Denise