Monday, November 17, 2014

The Twinery and Cardmaker Magazine blog hop Gift Card Holder


Today we are hopping with Cardmaker Magazine. Cardmaker is filled with all kinds of inspiration and ideas, make sure you check them out HERE and of course buy the twine you will need for this project HERE at The Twinery! Thanks for coming by from Suzanna Lee's blog - http://www.lifestrivialities.typepad.com/

************************
Yeah, some times you have to buckle down and get a gift card. Now they may not be as personal as a hand picked gift- you can make them super special with a handmade gift card holder. This gift card holder has a pretty cool but involved focal point- the twine weaved gift, but the rest of the card is super simple to assemble and I made a nice little Snapguide to show you how I did it!
Check out How to Make a Bakers Twine Gift Card Holder by Denise Hahn on Snapguide.


NEXT STOP! DoBea Alberts - http://www.plumpoppystudio.com/blog/

Don't Forget The Twinery is giving away this:
ENTER HERE


So hit up their blog for how to enter to win
SUPPLY LIST:
The Twinery Twine:
BUY HERE

BUY HERE
Cardstock: Core'dinations and October Afternoon
Tapestry Needle
Foam Squares


Monday, October 20, 2014

Clearsnap and Stencil Girl Blog Hop- Hand Dyed Fabric Pillow


I am on a quilting kick right now and although I am primarily a paper craft designer- I am always looking for ways to combine materials and techniques. Today I am playing with these two cool 9x12inch over sized stencils from StencilGirl:

Bubbles
Marrakesh Mix
I thought they would make a very cool hand dyed fabric. But since I am experimenting, I decided to start small and do a patchwork pillow- incorporating my hand dyed fabric into it. I used a resist technique and Izink Pigment, but you can also use any Clearsnap Pigment ink refill, or you can directly ink on the fabric with Colorbox Crafters Ink. Here is how I do the technique:
{first, you will want to spray the BACK of your stencil with repositionable fabric adhesive. Did you know there is a front and back to stencils? Just look closely on one of the corners you will see a manufacturers mark of some sort, thats the top!}

{lay your Stencil on top of a piece of muslin that is cut slightly larger than the stencil. Take some white acrylic paint and brush over the stencil. The white will act as the resist when we dye the fabric}


{I set up my dyes by dropping 3-4 drops into some small plastic containers. I use my melamine cutting board as a work surface, but a cookie sheet would work too}

{get the fabric immersed, and then lay out on the work surface}

{Now the dip in the dye is just to get the fabric wet and to allow the color to bleed. Now take the Izink dropper and drag over the fabric like show}

{now twist it to get the dye all soaked in (i know I should have done the demo with the blue-looks like a bloody mess!}

{Roll Fabric back out, and dab off excess ink from the stencil resist portion}

{Repeat with your other color. Hang out to dry making sure the drip area is over grass or dirt. When dry, press with a steam iron}
Sorry I didn't get more pics- but I go zoo into making this little pillow! Basically I cut the hand dyed fabric into 3- 2.5x9 inch strips, then used some of my on hand scraps for the rest.

{if you want to make your own I followed this free tutorial from DREAM PATCH HERE


{I quilted with a contrasting red to get my dyes fabric to stand out even more}


For the back I used and inexpensive screened cotton fabric- it mimic the resist technique on front

{Its just a little pillowcase pocket opening on the back for each cleaning}

Puffy Loves his new pillow, and I love it for sitting my laptop on when it gets to hot o my lap!

SUPPLIES:
white acrylic paint
Muslin
Foam Brush
Extra fabric and Batting
Pre made pillow form


Friday, October 3, 2014

Easy Recipe for World Card Making Day

World Card Making Day 2014 with the Clearsnap Creative Team

Today is a fun day for The Clearsnap Creative Team- World Card Making Day! Celebrating its ninth year in 2014, World Card Making Day is celebrated annually on the first Saturday in October. It's a day for the card-making communityhobbyists, retailers, and manufacturersto unite and celebrate the connection and creativity that is the heart of card making.  Make sure you check out the Official World Card Making Day site to submit your work and enter to win an amazing prize pack from the WCMD 2014 sponsors (like us!).
Today I am sharing an easy recipe for the beginner card maker. Why call it a recipe? Think of card making as cooking. If your just learning you want to start with an easy recipe. As you grow more confident, you will add in a few tweaks to that recipe. After you have really mastered it, you will start making "dishes" of your own.  Clearsnap has an awesome product for the beginner; Colorbox Creative Cards. Simply decorate the pre-printed cards by spraying or stamping over the design then layering embellishments onto dry card. The best part is you get 5 preprinted cards (5 1/2" x 4 1/4" folded) and 5 blank envelopes. Here is the recipe:
1) Choose 3 or more Colorbox Stamp Pads (all of them will work!) and using a Colorbox Stylus tool and tip- blend onto the card starting with the darkest color on bottom and work your way up blend in as you go
2) Take 1 Yard of Bakers Twine (I use The Twinery) and wrap around card top and tie in a bow on the side
3) Choose a Focal Piece- this can be a Stamp on plain cardstock- a chipboard from a scrapbook paper collection, or even a sticker. Add foam squares to pop it out, and attach to the center of your card. A focal piece should take up around 1/3 of the card space
And that's it! Let me walk you through these three very different cards, that are actually all the same.
{for this card I used a die cut from Authentiques Thrilling collection. The Inks are Donna Salazar Mixed Media Chox in Butternut and Adobe. And Colorbox Chalk in NEW Harvest. The edging is a Colorbox Cats Eye in Wicked Black}


{This Card uses all Colorbox Crafters Inks in NEW Sunshine, Limelight form the Ann Butler Collection, along with  Aruba and Sweet Pea. The stamp (from the dollar bin at Michales) is stamped in Berry}

{As an extra detail- adding in the twist on the recipe- some Smooch Glitz in Pink Fizz on the candle flames}


{For this one a did another twist on the recipe. The Focal sticker I chose from Authentique Be-You-tiful Collection was big and covered the twine, so I moved it up and the twine down- then added in a little Petaloo Flower. I chose some metallics for this one; Starting at the bottom with Crafters Ink in Stone, Colorbox Pigment Ink in Silver, and finally some Twinkle in Pearl}


{This is what the plain Creative Card looks like before getting all inked up}

{Creative Cards comes in all different designs just waiting for you to cook something up for World Card Making Day!

Continue on the hop by visiting these team members' blogs! Leave a comment on each and use the widget below to enter to win a prize pack just for Clearsnap followers!!

  Clearsnap Blog
  Denise Hahn (You are here)
  Meihsia Liu (Go here next)
 Vivian Keh
  Steph Ackerman

Enter our giveaway here (and happy hopping!!):
  a Rafflecopter giveaway

-Denise

Monday, September 29, 2014

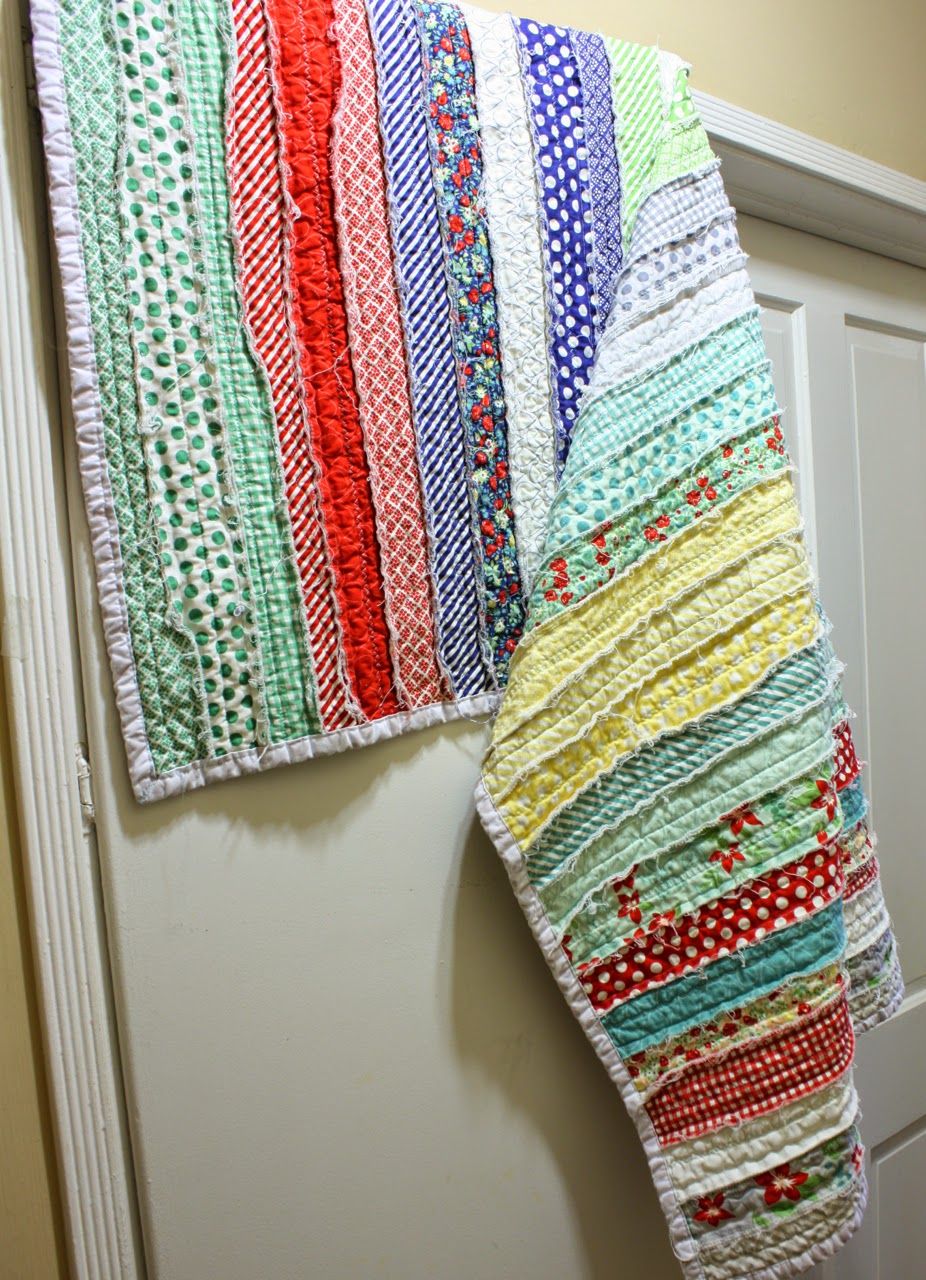
My First Quilt

So I have never really been interested in quilting. Math? Gah... Precision? Eww... And I guess a lot of the old fashioned granny square type quilts were just not my style. That was until I saw this super cute quilt on Craftsy.
It's called a Rag Quilt by Sweetwater and you can find it HERE or on Etsy HERE. Then I started really looking more into quilting and realized it has a lot of similarities to paper crafting. Mixing together papers and fabrics is pretty much the same thing- but you can't snuggle up with a greeting card at the end of the day! Now I am quilting obsessed. I just bought a book Fabulously Fast Quilts by Amy Smart who as an awesome blog; Diary of a Quilter and am excited to start another project out of her book. Another bonus is I have learned SO MUCH MORE about my sewing machine and the different feetr. So far I have used my; walking foot, stitch in the ditch foot, and also figured out what some of the mystery stitches on my machine were! Stitch #39-40 are called Piecing Stitches and if I select those it gives me the perfect 1/4 inch seam allowance using the edge of my foot as the guide- who knew?! Here is my finished quilt, I love it so much.


{I even made my own custom label}


{I cut my own 2.5 inch strips for the backing- didn't want to use all the valuable Moda fabric on the back!}

 I used a Moda April Showers Jelly Roll to make it. Can't wait to get started on my next cozy masterpiece!
-Denise

Saturday, September 20, 2014

BLOG HOP Giveaway with The Twinery and Ruby Rock-it


Welcome hoppers hopefully you came here from the Netherlands... or at least from Moniques Awesome blog HERE. Ready for some more inspiration from The Twinery and Ruby Rock-It? I got Ruby's Oriental Chic to play with and the second I saw it I thought of an adorable picture of my friends baby dressed up like a little piece of sushi! Now that's a picture that deserves memorializing in a scrapbook page and here is what I came up with-

{Twine is always a great accent piece, and the metallic copper I used played off the foil in the background paper and the "baby" letters}

{I always look for a place to add an extra little twine and this addition balanced nicely}

{Ruby Rock-it has amazing wood embellishments that are a great contract to the bold colors and metallics}


NOW- how about those prizes???

Ruby Rock-It will be giving away the Essence Empire Bebe collection (Album not included).

The Twinery will be giving away THREE FULL SPOOLS of twine (winner’s choice!) ($45 retail value). Hoppers can visit the Twinery blog and the Ruby Rock-It blog to ​find out how to enter to win.

supply list:
The Twinery- Copper Shimmer Twine
Ruby Rock-it- Oriental Chic Collection Embellishments, stickers and paper pack

Now you are off to visit Rebecca at her blog Hugs Are Fun!

Here's the whole blog roll for today just in case!:
Ruby Rock-It - http://www.rubyrock-it.com/articles
The Twinery - http://thetwinery.com/blog
Jenifer Cowles - http://stitchcutcreate.blogspot.com/
Melyssa Connolly - http://www.fantastink.blogspot.com/
Pattie Beltran - http://www.pattiebeltran.blogspot.com/
Katarina Damm-Blomberg - http://krumeluran.wordpress.com/
Jeanne Jachna - http://akeptlife.blogspot.com/
Monique Liedtke - http://moniquesscrapbook.blogspot.nl/
Denise Hahn - http://www.inmyblueroom.blogspot.com/ <-----you are="" b="" here="">
Rebecca Greco - http://hugsarefun.com/