Showing posts with label Christmas. Show all posts

Monday, December 2, 2013

Heidi Swapp Color Shine Wreath- With Xyron

Okay so I LOVE making banners, and when Xyron Teamed up with Heidi Swapp this month and sent me some Color Magic Jumbo Pennants- all I could think of is how not to do the "obvious" banner! Well lo and behold these pennants make a great wreath too! I LOVE LOVE Heidi's Color Shine Bronzer- truly amazing I can't really explain it- but it sometimes looks gold, sometimes looks silver, and sometimes looks bronze. Just really beautiful depth in this spray. So let me take you a bit through this project to get you started, then you are on your own to embellish away!

{First I sprayed all of my pennants with Heidi Swapp Color Shine Spray in Bronzer- I used a sponge to spread it around}

{I used a paper plate for a template and cut out a piece of chipboard and then some of Heidis cardstock "Believe Santa Baby"  to cover it and attached using my Xyron Mega Runner

{After my Color Magic Jumbo Pennants dried I run them through my Xyron 5 Inch Creative Station with permanent adhesive}

{I then stick them to some heavy card stock- if you don't they will curl and not stand up to being hung vertically}

{I then inked all the edges with ColorBox Silver Pigment ink- there is NO BETTER metallic ink in the universe!}

I then used Aileens Tacky Glue to attach the pennants to my back piece. Why you ask? It needs to be super strong to hang vertically AND you have "play" time to get them arranged just right- no doing that with sticky back adhesive or hot glue}

{Okay so now you can embellish how you wish, but I will show you how I made my tree! Cut 4 to 5 4x6 Inch pieces of "Believe Peppermint Sticks" paper and then score longways at the center mark}

{Then trim from the top of your scoreline to the bottom corner to create the tree shape-trust me way easier to score first then fold-trying to fold the tree shape after you cut it is a pain!}

{Grab some of the awesome ColorBox ink and ink it up!}

{Run a bead of hot glue up the center line and just keep stacking them up!Then fan out to create your tree!I used Heidi's Color Magic Pressed Paper Frames sprayed with more Color Shine Bronzer and her "Believe Jingle All the Way" paper to finish off my design. Here is what I did:
{ I cut out some big letters and glittered them with recollections Fine Glitter in red and attached with Teresa Collins Foam Squares}

{Here is my tree and a few of Heidis Color Magic Flowers sprayed with Color Shine Gold and Bronzer- there's a little Petaloo one in there too!}

{here I just backed the Pressed Paper Frames with the Jingle All the Way paper.You can see in this picture how cool the Color Shine Bronzer Looks-gold and silver all together!}


\


{I love how the Pennants have Silver highlights- I just happened to be wearing an orange sweatshirt you can see glowing in the silver part!}

{Such a fun project and the colors you can do this in are limitless with Heidis Color Shine Sprays! How bad do I want THIS for Christmas!}
Happy Creating to you!!!!


Sunday, November 24, 2013

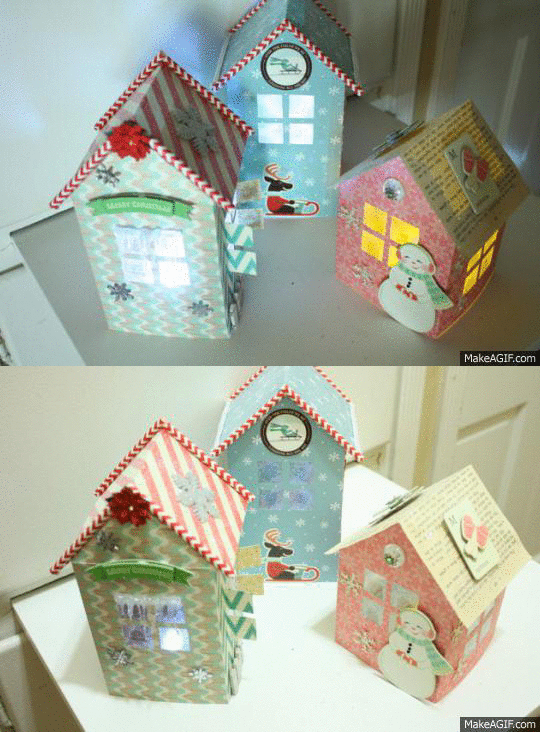
Paper Christmas Village With Xyron Frosted Windows

xmas final final on Make A Gif
make animated gifs like this at MakeAGif
Yay! Holy cow I made a an animated photo! I just really wanted to show the before and after of my adorable little paper houses! No template necessary just watch my video tutorial and I will show you how it's done! The Star of these little houses though is my Frosted Window Technique using my Xyron 5 Inch Creative Station! Seriously I actually impressed myself with one lol! So here is a little home tour of my houses I made with American Crafts- Bundeled UP and Peppermint Express Collections.
Here are all 4 sides of House 1 Made with American Crafts Crate Paper Bundled Up Collection

I used a Petaloo Pointsetta, made some icicles with some hot glue and added a few mirror snowflakes from Michaels. The Chevron Straws are from Queen & Co. and I got them at Hobby Lobby

The rooftop glitter is a mix of Martha Stewart Tinsel Glitter and Clearsnap Winters Frost


Snowflake and wood fence from Michaels
The Next House I made with American Crafts Peppermint Express

All you need is two sheets of card stock and one sheet of American Crafts Peppermint Express Remarks Stickers! Aren't they cute?

Just used some good ole fabric store trim


Now here is another one from Bundled Up. I love Pink for Christmas. I gave this one a little more of a vintage feel by Adding vintage book paper for the roof. I also shortened this one by chopping off 2 inches. This house pattern is easy-as long as you keep it 8.5 inches wide- you can really make it from 6 inches for a smaller house to 10 inches for a high rise.

I added some Prima Pebbles to each side and used the Bundled Up Standouts and Layered Stickers too.


So I wanted to give you a close up of the frosted windows. Too cool right?? Watch my Vid at the end and I show you how to do it!


I love how with just a little turn, you can create a whole new look!


So what are you waiting for! lets make a Village!

HOW TO MAKE: